前言 停更了一周,其实前些天倒是也学了点,但是五一假期太诱人了,都想把事情放在假期来做,然而前两天基本上就睡过去了,所以拖到了今天。Android这部分,2月份疫情期间学了不少,不过之后开始更新Windows内核的内容了,也就没续上,之前又做了一遍实验,发现很多坑都没有再踩。所以这篇可能会漏掉部分我以前遇到的坑。
之前有计划在3月下旬就开始更新Android,后来发现,由于先前日更的缘故,周末其实也是比较赶进度的,所以拖了很久,现在不日更了,Windows内核的基础部分,也就差个多核同步以及APC了,所以就可以偶尔穿插的更新些Android相关的了,把这部分的内容再巩固下。(题外话,瀚哥真是个狠人,感觉他醒着的时间都在学习新的内容,认识这个世界,太佩服了)
回到本篇的内容,我计划是在博客里演示一遍虫神书上的第一个逆向实验,但是需要一些准备工作,比如CrackMe程序代码的编写,部分Android逆向用到的工具下载及配置等等,所以这篇叫做准备工作,具体程序逆向分析,会在下一篇进行。
编写Android程序 首先我们需要编写一个简单的Android程序,实现一个低级的注册功能(仅有前端部分),然后再逆向分析,破解这个程序。一个Android程序主要编写的是布局文件 和功能实现 的部分,这两部分,分别使用xml和Java/Kotlin语言编写(本篇采用Java)下面来看代码
activity_main.xml 布局文件,本次实验采用的约束布局(ConstaintLayout),相关内容可参考此处
1 2 3 4 5 6 7 8 9 10 11 12 13 14 15 16 17 18 19 20 21 22 23 24 25 26 27 28 29 30 31 32 33 34 35 36 37 38 39 40 41 42 43 44 45 46 47 48 49 50 51 52 53 54 55 56 57 58 59 60 61 62 63 64 65 66 <androidx.constraintlayout.widget.ConstraintLayout xmlns:android ="http://schemas.android.com/apk/res/android" xmlns:app ="http://schemas.android.com/apk/res-auto" xmlns:tools ="http://schemas.android.com/tools" android:layout_width ="match_parent" android:layout_height ="match_parent" tools:context =".MainActivity" > <TextView android:id ="@+id/tv_name" android:layout_width ="99dp" android:layout_height ="51dp" android:text ="Username" app:layout_constraintBottom_toBottomOf ="parent" app:layout_constraintEnd_toEndOf ="parent" app:layout_constraintHorizontal_bias ="0.179" app:layout_constraintStart_toStartOf ="parent" app:layout_constraintTop_toTopOf ="parent" app:layout_constraintVertical_bias ="0.242" /> <TextView android:id ="@+id/tv_code" android:layout_width ="99dp" android:layout_height ="51dp" android:text ="Code" app:layout_constraintBottom_toBottomOf ="parent" app:layout_constraintEnd_toEndOf ="parent" app:layout_constraintHorizontal_bias ="0.179" app:layout_constraintStart_toStartOf ="parent" app:layout_constraintTop_toTopOf ="parent" app:layout_constraintVertical_bias ="0.317" /> <EditText android:id ="@+id/ed_name" android:layout_width ="188dp" android:layout_height ="51dp" app:layout_constraintBottom_toBottomOf ="parent" app:layout_constraintEnd_toEndOf ="parent" app:layout_constraintHorizontal_bias ="0.695" app:layout_constraintStart_toStartOf ="parent" app:layout_constraintTop_toTopOf ="parent" app:layout_constraintVertical_bias ="0.219" /> <EditText android:id ="@+id/ed_code" android:layout_width ="188dp" android:layout_height ="51dp" app:layout_constraintBottom_toBottomOf ="parent" app:layout_constraintEnd_toEndOf ="parent" app:layout_constraintHorizontal_bias ="0.695" app:layout_constraintStart_toStartOf ="parent" app:layout_constraintTop_toTopOf ="parent" app:layout_constraintVertical_bias ="0.294" /> <Button android:id ="@+id/btn_reg" android:text ="Register" android:layout_width ="88dp" android:layout_height ="51dp" app:layout_constraintBottom_toBottomOf ="parent" app:layout_constraintEnd_toEndOf ="parent" app:layout_constraintHorizontal_bias ="0.695" app:layout_constraintStart_toStartOf ="parent" app:layout_constraintTop_toTopOf ="parent" /> androidx.constraintlayout.widget.ConstraintLayout >
MainActivity.java 这里采用MD5算法 ,根据输入的用户名计算出一个哈希值 ,作为用来校验的注册码。具体实现部分,用到了Java提供的MessageDigest类,使用方法可以参考此篇文章
1
2
3
4
5
6
7
8
9
10
11
12
13
14
15
16
17
18
19
20
21
22
23
24
25
26
27
28
29
30
31
32
33
34
35
36
37
38
39
40
41
42
43
44
45
46
47
48
49
50
51
52
53
54
55
56
57
58
59
60
61
62
63
64
65
66
67
68
package com.droider.crackme_0x1;import androidx.appcompat.app.AppCompatActivity;import android.os.Bundle;import android.os.Message;import android.view.View;import android.widget.Button;import android.widget.EditText;import android.widget.Toast;import java.security.MessageDigest;import java.security.NoSuchAlgorithmException;public class MainActivity extends AppCompatActivity private Button btn_reg; private EditText ed_name, ed_code; private void initialView () btn_reg = (Button)findViewById(R.id.btn_reg); ed_name = (EditText)findViewById(R.id.ed_name); ed_code = (EditText)findViewById(R.id.ed_code); btn_reg.setOnClickListener(new MyListener()); } @Override protected void onCreate (Bundle savedInstanceState) super .onCreate(savedInstanceState); setContentView(R.layout.activity_main); initialView(); } class MyListener implements View .OnClickListener @Override public void onClick (View v) String inputName = ed_name.getText().toString(); String inputCode = ed_code.getText().toString(); MessageDigest md = null ; try { md = MessageDigest.getInstance("MD5" ); md.update(inputName.getBytes()); byte [] result = md.digest(); StringBuffer sb = new StringBuffer(); for (int i = 0 ; i < result.length/2 ; i++) { int val = result[i] & 0xff ; sb.append(val); } if (sb.toString() == inputCode){ Toast.makeText(MainActivity.this , R.string.success, Toast.LENGTH_SHORT).show(); } else { Toast.makeText(MainActivity.this , R.string.unsuccess, Toast.LENGTH_SHORT).show(); } } catch (NoSuchAlgorithmException e) { e.printStackTrace(); } Toast.makeText(MainActivity.this , "Failed" , Toast.LENGTH_SHORT).show(); } } }
程序运行 下面在Android虚拟机上运行app:
可以看到,当我们输入用户名以及校验码的时候,会显示Register Failed,原因是我们输入的校验码是错的;当输入正确的校验码时会显示Register Succeed。下一篇会学习如何通过逆向暴破这个程序。本篇是准备工作,所以此时程序已经满足了我们的要求,下面介绍一下本次实验用到的工具及其相关内容。
右键命令行 右键命令行设置主要是为了方便,因为后期逆向的程序越来越多,分布在不同的文件夹,有些命令需要在命令行中执行(Basn on Windows执行不了时),进入命令行如果从切换盘开始一点点找,固然是麻烦的一件事,但有了右键命令行就可以较为方便的定位到当前目录下。比如我在写博客时用的Git Bash就设置了右键快捷键,可以在切换到博客目录后再进入Git Bash,不用打开后不停的用cd命令切换那么麻烦。
下面来看一下如何在右键快捷键中设置命令行:
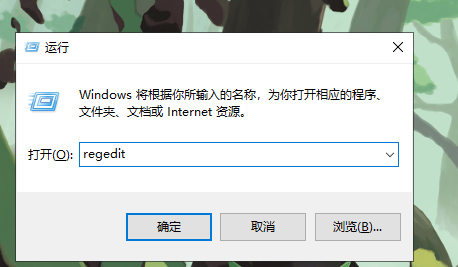
首先Win+r ,输入Regedit,进入注册表
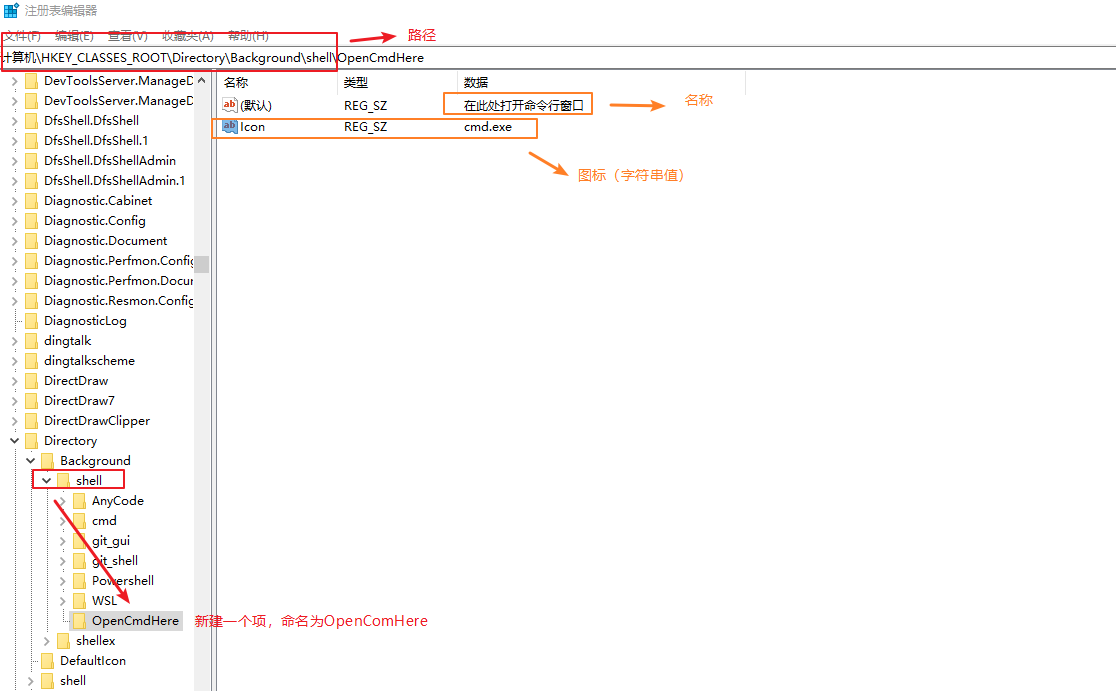
接着,我们查找路径
1 计算机\HKEY_CLASSES_ROOT\Directory\Background\shell
找到shell后,右键新建一个项 ,并命名为OpenCmdHere,这时,里面会有一个默认值,我们修改默认值 的数值数据 为“在此处打开命令行窗口 ”,这一步是设置右键看到的描述。然后再新建一个字符串值 ,名称 设置为“Icon ”,数值数据 设置为cmd.exe ,这一步是设置右键看到的图标。具体操作完了的情况如下图:
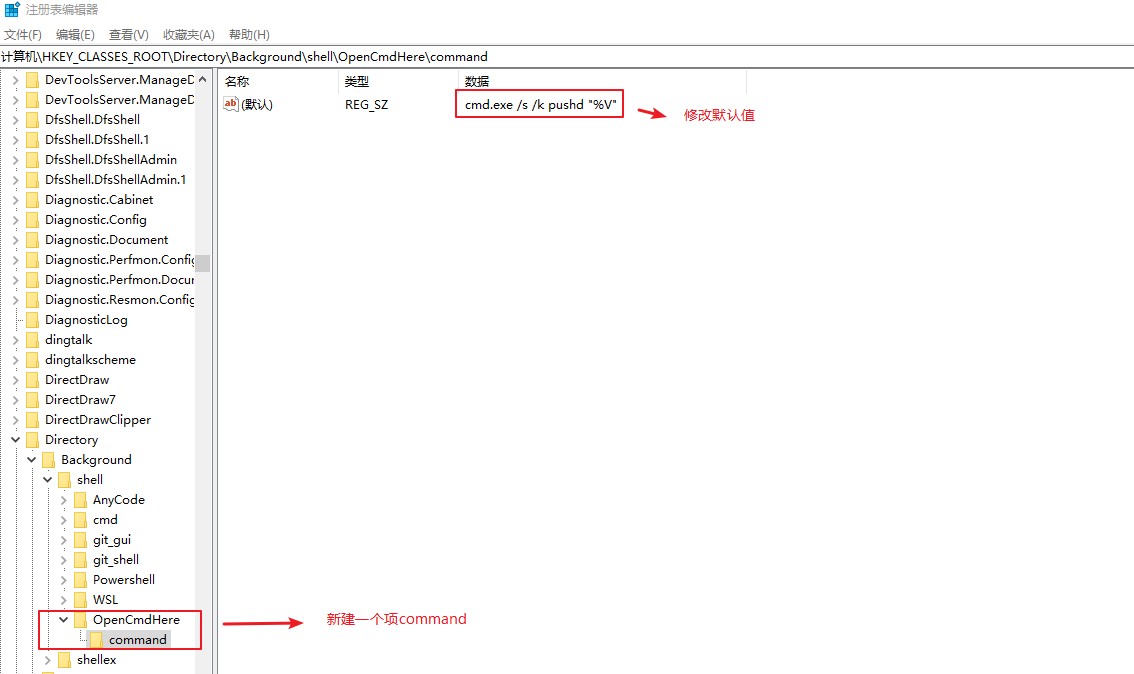
接下来,我们选择OpenCmdHere并新建一个项 ,命名为command ,并修改默认值的数值数据 为“cmd.exe /s /k pushd “%V” ”,具体如下图:
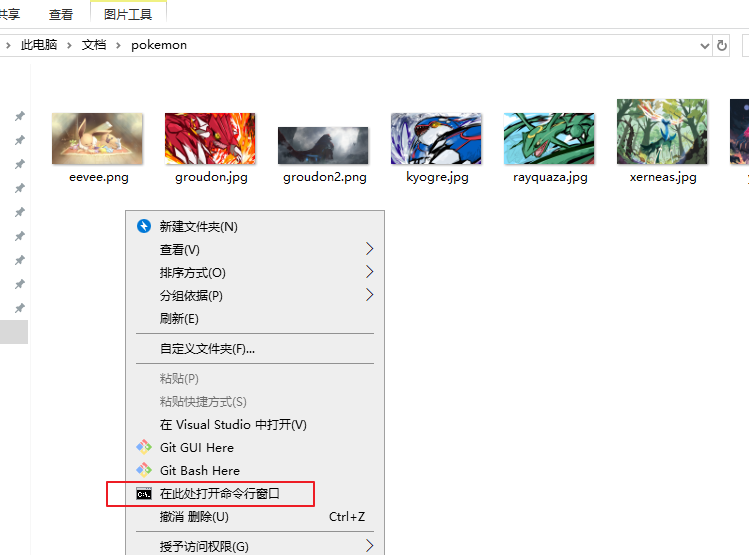
以上全部设置完后,退出注册表,随便进入一个文件夹,单机右键,就可以看到已经成功在右键快捷键中设置命令行。
在Android逆向分析中,会用到很多工具,例如Apktool,AndroidKiller,dex2jar,jd-gui等等,本篇中只介绍本次实验中会用到的工具,其余等到后期进一步作逆向分析时再讨论。
进入ApkTool官网 ,这里面有详细的安装教程,针对不同操作系统的都有,这里简单概述一下:
去这里 下载最新版的apktool.jar,例如我下载的是当前最新版本的apktool_2.4.1.jar(最好一定要下载最新版本的,不然反汇编Apk文件时会发生错误 )下载后,将apktool_2.4.1.jar重命名为 apktool.jar
下载批处理文件,由于官网好像挂掉了,我就直接复制我这份的:
1 2 3 4 5 6 7 8 9 10 11 12 13 14 15 16 17 18 19 20 21 22 23 24 25 26 27 28 29 30 31 32 33 34 35 36 @echo off setlocal set BASENAME=apktool_chcp 65001 2 >nul >nul setlocal EnableDelayedExpansionpushd "%~dp0"if exist apktool.jar ( set BASENAME=apktool goto skipversioned ) set max=0 for /f "tokens=1 * delims=-_.0 " %%A in ('dir /b /a-d %BASENAME% *.jar') do if %%~ B gtr !max! set max=%%~ nB:skipversioned popd setlocal DisableDelayedExpansionif "%~1 "=="" goto loadif not "%~2 "=="" goto loadset ATTR=%~a1if "%ATTR:~0,1% "=="d" ( set fastCommand=b ) if "%ATTR:~0,1% "=="-" if "%~x1"==".apk" ( set fastCommand=d ) :load java -jar -Duser.language=en -Dfile.encoding=UTF8 "%~dp0% BASENAME%%m ax%.jar" %fastCommand% %* for /f "tokens=2 " %%# in ("%cmdcmdline% ") do if /i "%%# " equ "/c" pause
新建一个批处理(.bat)文件 ,命名为apktool ,将上述内容copy进去然后保存
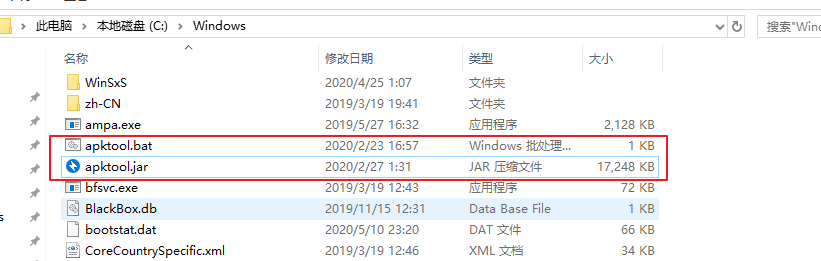
将apktool.bat和apktool.jar复制到C:\Windows目录下,如下图所示:
完成上述操作后,进入命令行,输入apktool,若结果如下图所示,说明apktool安装成功
AndroidKiller Apktool是对apk文件反汇编用的,AndroidKiller则可以用来分析,修改,签名等操作,当然,它也可以设置Apktool插件从而增加反汇编功能。默认也是有的。
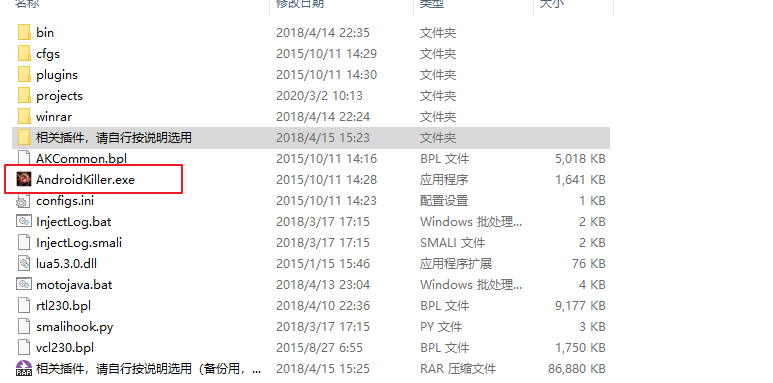
AndroidKiller可以直接去52pojie的爱盘 下载,下载压缩包后解压,有个AndroidKiller.exe,点击即可食用。
本次实验是采用apktool在命令行中对apk文件进行反编译的,想在AndroidKiller中完成也行,但是需要更新一下插件,用 前文中下载的最新版的apktool.jar替换目录AndroidKiller_v1.3.1\bin\apktool\apktool下的ShakaApktool.jar ,即可。
到这,准备工作也就完成了,过几天会再更新一篇,正式对我们编写的android程序进行逆向分析,有关AndroidKiller更多的使用方法可以参考吾爱破解上的一篇文章 。这里不再赘述。
参考链接 参考书籍:《Android软件安全权威指南》—— 丰生强
参考文章:
https://www.jianshu.com/p/17ec9bd6ca8a https://blog.csdn.net/hudashi/article/details/8394158a https://blog.csdn.net/mooneve/article/details/78821843 http://www.yishimei.cn/computer/700.html https://www.52pojie.cn/thread-726176-1-1.html